Pairing the handset (with a LCD display)
Before proceeding ensure the handset and the control valve / battery box have good batteries fitted
If the handset is in its factory reset condition, the
display will 7ESC and r and a number (as shown in the photo).
Picking up and holding the handset will unlock the keypad and the green
light will illuminate a solid green light (and the LCD backlight may come on if the
room is dark enough).
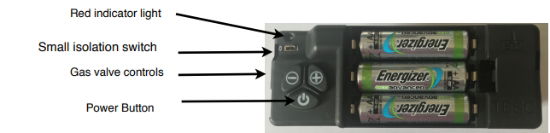
(NOTE: Ensure the small isolation switch on the control valve is in the ON (I) position).
Place the handset near the fire, i.e. within a metre (3 feet). No need to hold the handset at this time.
Simultaneously press and hold the + and - buttons on the control valve (not the handset)
until the red light on the control valve begins to flash rapidly (it will take about 5 seconds to start
flashing). Then immediately release the + and - buttons and quickly press the POWER
button on the control valve. Note: Pressing of the POWER button must be done within 1
second of the red light coming on. If not done quickly enough, then the above must be repeated until
done correctly.
When done correctly you will hear an audible sound from the handset and the display will show the
symbol " ⎤- -⎡ " and the green light on the handset will be flashing. You now have 60 seconds to
accept the pairing. To do this pick up and hold the handset to activate the unlocking of the keypad. Then press and hold the SET button for a few seconds.
You will hear a few beeps from the handset and the display will change and enter the SETUP menu.
Whilst maintaining your grip on the handset, you can now set the display functions of the handset.
Pressing the SET button advances through the settable features and pressing the MENU button returns back to the previous one.
Pressing + or – changes the displayed information, for example:-
H 24 – This is the 12 Hr or 24 Hr time format. Pressing + or – will change H24
into H12. Press SET To confirm the setting and move to the next menu.
Day of the week is Mo, Tu, We, Th, Fr, Sa, Su. Again pressing + or - will change the day of the week. Press SET To confirm the setting and move to the next menu.
Next set the correct Hour using the + and - buttons. Press SET to confirm.
Then set the correct minutes using the + and - buttons. Press SET to confirm.
The remaining parameters do not need adjusting so keep pressing the SET button
several times (about 7 times) to advance the display to the end of the menu.
You know when the setup menu has ended as will see the communication symbol (3 arcs of a circle) in
the upper right hand side of the display. This symbol indicates that the handset is in operation mode (not
setup) and in good communication with the control valve.
IMPORTANT NOTE : If you do not complete all of the setup, the pairing is still stored after pressing SET
the first time. The handset will re-enter setup mode as soon as the next unlock of the handset. Do not send a
pairing request again from the valve!
If this is done then another reset of the handset will be required and a new pairing done again.